How To Fix Automatic Pan Stirrer Gearbox Grinding?
That grinding noise from your automatic pan stirrer is hard to ignore. It often means something inside the gearbox needs attention right away.
Gearbox grinding usually points to worn gears or a misalignment issue. Left unchecked, this problem can stop your stirrer from working at all.
Your sauce needs steady stirring for the right texture. When the gearbox struggles, the stirring motion becomes weak or uneven. This affects your final dish more than you might expect.
The good news? You can often fix this problem yourself. This guide walks you through every step of the process.
We will show you how to safely disassemble the gearbox unit. You will learn to spot damaged gears and replace them correctly.
We also cover common mistakes people make during repairs. Many beginners expect too much from their automatic stirrer. Others reassemble parts incorrectly, causing bigger problems later.
By the end of this article, you will understand what causes gearbox grinding. You will also know how to fix it and prevent it from happening again.
Let’s get your pan stirrer running smoothly once more.
In a Nutshell
Here is a quick summary if you want the short version.
-
Grinding noise means your gearbox has worn gears or a misalignment problem. This stops your stirrer from mixing your sauce properly.
-
Fixing it means you remove the gearbox and open it up. You look at the planetary gears or spindle gear inside.
-
Worn parts need replacing. Swap out any gear that looks damaged or chewed up before you put things back together.
-
Clean grease off every part first. Old grease traps grit and makes new lubrication less effective.
-
Alignment matters a lot. Check that gears sit correctly and the motor lines up before you test the stirrer.
-
Mistakes happen when people rush reassembly or skip lubrication. This causes the grinding to come right back.
-
Keep in mind, automatic stirrers have limits. They cannot scrape pan sides or change angle like your hand can. Manual stirring still gives you better control for tricky recipes.
Follow these steps and your stirrer should run quiet again soon.
What Causes Gearbox Grinding in Automatic Pan Stirrers
Gearbox grinding happens when the internal gears wear down or sit in the wrong position. Worn gears lose their smooth teeth, which causes that loud grinding sound. When teeth chip or flatten, they no longer mesh properly with other gears.
Misalignment is another major culprit. If the gearbox gets bumped or dropped, the internal components shift out of place. Even a small shift stops gears from engaging smoothly. The motor still tries to turn, but the gears clash instead of rolling together.
Lack of lubrication speeds up wear dramatically. Old or dried out grease lets metal rub directly on metal. Friction builds heat, and heat damages the gear teeth faster. Over time, this grinding gets worse and louder.
Using your automatic stirrer on the wrong heat setting causes problems too. High heat can warp plastic gearbox housings or damage internal seals. If hot oil or sauce leaks into the gearbox, it breaks down the lubrication and causes grinding.
Debris inside the gearbox also triggers grinding sounds. Food particles, dust, or old grease buildup can jam the gears. When something blocks smooth rotation, you hear that grinding noise.
Continuous operation without breaks strains the gearbox. These devices need rest periods. Running them nonstop forces the gears to work beyond their design limits.
Finally, manufacturing defects sometimes cause grinding from day one. A gear might have a crack you cannot see, or the assembly might be slightly off from the factory. This is rare, but it does happen.
Understanding these causes helps you prevent grinding in the future and fix it properly now.
Tools and Safety Precautions Before You Begin
Before you start taking apart your automatic pan stirrer, gather the right tools and prepare your workspace safely. Having everything ready prevents frustration and keeps you protected during the repair.
Essential tools you will need include a socket wrench set, screwdrivers (both flathead and Phillips), an adjustable wrench, and pliers. A small brush helps you clean old grease from the gearbox components. You should also have a clean cloth or paper towels nearby. A container for small screws and parts keeps everything organized so nothing gets lost during disassembly.
Safety comes first when working with mechanical parts. Unplug your automatic stirrer completely from the electrical outlet. Never work on a plugged in device, even if it is off. Wait at least 10 minutes after unplugging to let any residual power dissipate from the motor.
Wear safety glasses to protect your eyes from grease splatter and small metal shavings. Work gloves keep your hands clean and protected from sharp edges inside the gearbox. Choose a well lit workspace with plenty of room to spread out parts.
Prepare your work area by laying down newspaper or a drop cloth. This catches grease drips and makes cleanup easier. Have a small bowl or tray ready for screws and springs as you remove them. Label or photograph each step if you are unsure about reassembly later.
Keep a manual or reference guide nearby if your stirrer came with one. This helps you understand the specific layout of your gearbox model. Having a helper available is useful too. They can hold parts steady or hand you tools while your hands are busy.
Step-by-Step: Disassembling the Gearbox Unit
Start by unplugging your automatic pan stirrer from the electrical outlet. Safety first. Let the unit cool completely if you’ve used it recently, as internal components may be hot.
Locate the fasteners holding the gearbox unit to the motor housing. Most automatic stirrers use bolts or screws on the bottom or side of the unit. Use your socket wrench or screwdriver to remove these fasteners carefully. Keep them in a small container so you don’t lose them.
Gently pull the gearbox away from the motor. You may need to wiggle it slightly to break the seal. Take note of how the gearbox connects to the motor shaft before full separation occurs.
Once removed, examine the exterior for any visible cracks or damage. Look at the mounting points to see if anything appears bent or misaligned. This information helps you understand what went wrong.
Now locate the bolts or clips holding the gearbox case together. These are usually positioned around the perimeter of the unit. Remove them systematically, working from one side around to the other. This prevents uneven pressure that could damage internal parts.
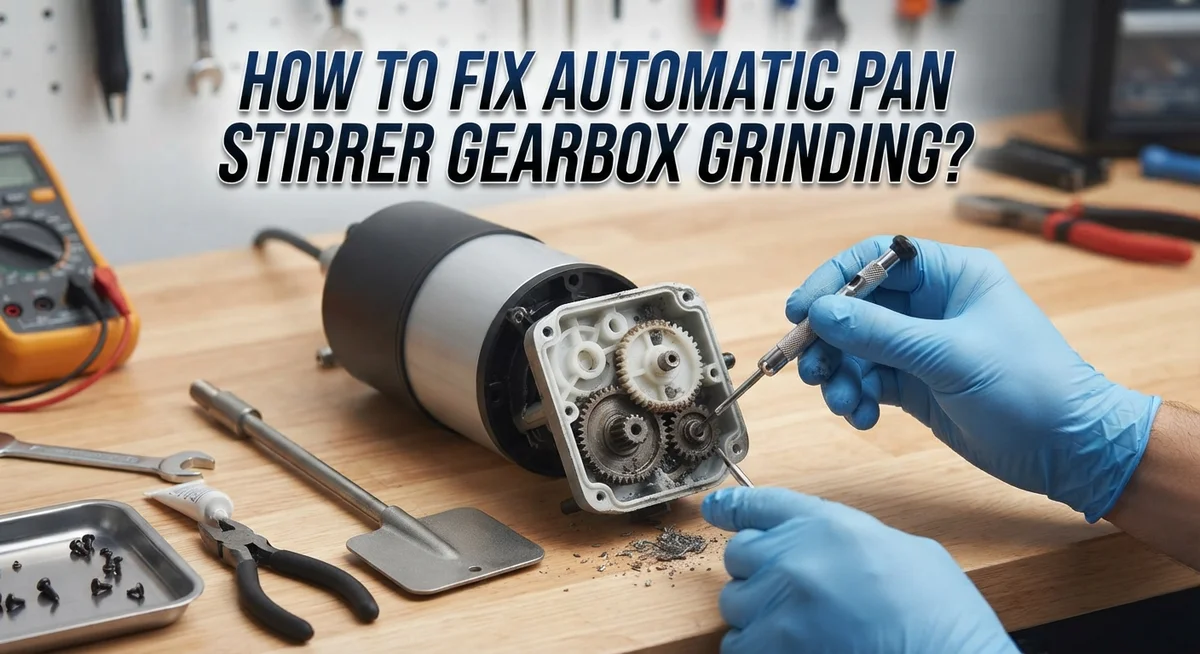
Carefully open the gearbox case. Inside you’ll find the planetary gears or spindle gear components. Take a photo with your phone before proceeding. This visual reference helps during reassembly.
Remove the gears one at a time. Note their position and orientation. Look for worn teeth, cracks, or discoloration on each gear. Discolored areas often indicate heat damage from friction.
Inspect the gear shafts for bending or wear marks. Clean all surfaces thoroughly with a cloth. Avoid using water as it can cause rust on metal components.
Set all parts on your clean work surface in the order you removed them.
Inspecting and Replacing Worn Gears
When you open your gearbox, you’ll see the internal components that make your stirrer work. Worn gears look dull and have visible teeth damage. The teeth may appear flat, chipped, or ground down. Compare them to new gear teeth, which are sharp and shiny.
Check the gear shafts carefully. Bent shafts prevent gears from spinning smoothly. Run your finger along each shaft to feel for warping. A straight shaft feels uniform. A bent shaft has high spots and low spots.
Look at the gear engagement area. This is where two gears mesh together. Proper engagement means teeth interlock tightly without gaps. If you see space between teeth or uneven contact marks, the gears are misaligned.
Examine the gear material itself. Some gears are plastic, others are metal. Plastic gears crack and break more easily. Metal gears wear gradually but last longer. Either type can fail if your stirrer runs continuously without rest.
Check for metal shavings inside the case. These tiny particles indicate active wear happening right now. Wipe them away with a clean cloth before reassembly.
To replace worn gears, note their exact size and tooth count. You need matching replacements. Remove the shaft bolts holding each gear in place. Slide the old gear off carefully. Install the new gear and tighten the bolts securely.
Verify that all gears spin freely by hand before closing the case. Gears should rotate without grinding sounds or resistance. If spinning feels rough, something is still misaligned.
Clean all old grease from the case interior using a degreaser. Dry everything completely. Apply fresh lubricating grease to all gear teeth and shafts. This reduces friction and prevents future grinding.
Reassembly and Alignment Best Practices
When you reassemble your gearbox, alignment matters more than anything else. Misaligned gears will grind again immediately, even if you replaced worn parts. Start by cleaning the gearbox case completely with a degreaser. Remove all old grease and debris from every surface.
Place the gearbox case on a flat, level work surface. This prevents tilting during reassembly. Install the gear shafts first, starting with the main spindle shaft. Ensure each shaft sits fully in its bearing pocket. The shaft should not move side to side.
Next, install the planetary gears or smaller gears according to your stirrer’s design. Check that each gear meshes smoothly with its neighbor. Gears should touch along their entire tooth face, not just at the tips. Spin each gear by hand to confirm smooth rotation.
Verify motor alignment before closing the case. The motor shaft must line up perfectly with the input shaft on the gearbox. Even a slight angle causes grinding and premature wear. Use a straightedge or alignment tool if your stirrer manual recommends one.
Apply fresh lubricant to all moving parts before sealing the case. Use the correct grease type specified in your manual. Too much grease creates friction and heat. Too little grease causes metal on metal contact.
Close the gearbox case carefully and tighten all bolts evenly. Tighten in a crisscross pattern, not in a circle. This distributes pressure uniformly across the case. Check that no bolts stick out or interfere with moving parts.
Finally, reattach the gearbox to the motor housing. Ensure the connection is secure before testing your stirrer.
Common Mistakes That Lead to Recurring Grinding
Many people make mistakes when dealing with grinding gearboxes. These errors often cause the same problem to return shortly after repair.
Expecting automatic stirrers to work like manual ones is the biggest mistake. Automatic stirrers cannot scrape pan bottoms, adjust angles mid cooking, or respond to heat changes the way your hand can. They simply rotate continuously. When people expect more, they push the motor harder or leave it running longer than designed. This extra stress damages gears faster.
Improper reassembly causes most recurring grinding issues. After you replace worn gears, misalignment during reassembly creates new grinding sounds within weeks. The motor shaft must line up perfectly with the gearbox input shaft. Even slight tilting ruins the repair. Many people rush this step and skip verification checks.
Inadequate lubrication after repair leads to quick gear failure. Fresh lubricant protects metal surfaces and reduces friction. Skipping this step or using old grease means gears wear rapidly. The grinding returns because parts lack proper protection.
Ignoring cleaning before reassembly traps metal shavings inside the case. These particles act like sandpaper on new gears. Grinding resumes because contamination continues damaging components.
Using incorrect replacement gears also creates problems. Gears must match exact size and tooth count specifications. Wrong gears disengage improperly and create grinding sounds immediately or within days.
Failing to inspect gear shafts for bending means you install damaged parts. Bent shafts cause misalignment automatically, guaranteeing grinding returns.
Avoid these mistakes by working slowly, verifying alignment carefully, cleaning thoroughly, and using correct replacement parts. Proper repair prevents the grinding from coming back.
Preventive Maintenance to Extend Gearbox Life
Regular maintenance stops grinding before it starts. The key is keeping your gearbox clean and well lubricated at all times.
Check your stirrer monthly for any unusual sounds. Listen for grinding, squeaking, or rattling during operation. These noises tell you something is wrong inside the gearbox. Stop using the stirrer immediately if you hear grinding sounds.
Clean the gearbox exterior every two weeks. Dust and food particles accumulate on the outside and work their way inside. Use a damp cloth to wipe down the motor housing and gearbox case. Make sure water doesn’t drip into any openings or seams.
Lubrication is critical for gearbox health. Check your stirrer’s manual to find the lubrication points. Most automatic stirrers have a small grease fitting or access port on the gearbox. Apply fresh lubricant every three months of regular use. Don’t over lubricate, as excess grease attracts dirt and causes buildup.
Inspect the power cord and motor connections regularly. Loose electrical connections cause the motor to run inefficiently, which puts extra strain on the gearbox. Tighten any loose plugs or connectors you find.
Store your stirrer in a dry location when not in use. Moisture promotes rust on metal gears and corrosion inside the case. Cover the unit with a cloth to keep dust away.
Replace worn parts before they fail completely. If you notice the stirring motion becoming slower or weaker, the gears are wearing out. Early replacement prevents total gearbox failure and grinding sounds.
Following these steps extends your gearbox life significantly and prevents expensive repairs down the road.
When to Repair vs When to Call a Professional
Deciding whether to repair your automatic pan stirrer gearbox yourself or hire a professional depends on several practical factors.
You should attempt DIY repair if: The grinding just started recently. You have basic mechanical skills and proper tools. The gearbox disassembly looks straightforward for your model. You feel confident working with small gears and motor components. Your stirrer is older or less expensive to replace.
You should call a professional if: The grinding has persisted despite your attempts to fix it. You lack experience taking apart mechanical devices. Your stirrer is under warranty or recently purchased. The gearbox design appears overly complex for your skill level. You cannot identify which specific gears are damaged.
Professional repair services offer real advantages. Technicians have specialized tools and replacement gears in stock. They understand alignment requirements that prevent future grinding. They can diagnose hidden problems you might miss. Most professionals guarantee their work for a set period.
Consider the cost factor carefully. If repair costs exceed 60 percent of a new stirrer’s price, replacement makes more sense. However, if your stirrer works well otherwise, repair becomes worthwhile.
Time matters too. DIY repairs take several hours if you work slowly and carefully. Professional repairs usually complete within one to three business days. If you need your stirrer functioning quickly, professional service saves time.
Start with inspection first. Remove the gearbox and examine the gears closely. Look for visible damage, metal shavings, or obvious wear. This inspection helps you decide confidently whether DIY repair suits your situation. If uncertainty remains, contacting a professional eliminates guesswork and prevents costly mistakes during reassembly.
Final Thoughts
Fixing a grinding gearbox in your automatic pan stirrer takes patience and attention to detail. Grinding noises always signal a mechanical problem that needs your immediate attention. Ignoring these sounds leads to complete gearbox failure over time.
The repair process follows a clear path. You remove the gearbox, inspect the gears, replace damaged parts, and reassemble everything carefully. Each step matters for a lasting fix.
Proper alignment during reassembly makes the biggest difference in whether your repair succeeds. Rushing this step causes most repeat grinding problems. Take your time here.
Cleaning old grease and metal shavings before you put the gearbox back together prevents future damage. This simple habit saves you from repeating the same repair soon after finishing it.
Remember that automatic stirrers work differently than manual stirring. They cannot scrape pan edges or adjust their angle based on heat changes. Understanding this limitation helps you set realistic expectations for your device’s performance.
Regular maintenance remains your best defense against gearbox grinding. Monthly checks catch small issues before they turn into expensive repairs. Cleaning and lubricating on schedule keeps your gearbox running smoothly for years.
Sometimes a repair job goes beyond your comfort level or tools. Professional help makes sense when grinding persists after your repair attempts. It also makes sense when repair costs approach the price of a new unit.
Trust your judgment on this decision. Weigh your time, skills, and the actual cost involved. A well maintained stirrer serves you reliably for a long time. Address grinding sounds early and follow proper repair steps. Your gearbox will thank you with quieter, smoother operation.
Frequently Asked Questions
Why does my automatic pan stirrer gearbox grind?
Grinding sounds mean the gears inside your gearbox are damaged or misaligned. This happens when worn teeth on the gears no longer fit together smoothly. Metal shavings from this wear can make the grinding worse. The stirrer motor still tries to turn, but the gears slip and clash instead of meshing properly.
Grinding also occurs when the gearbox assembly shifts out of position. This misalignment forces gears to contact at wrong angles. Over time, this damages both the planetary gears and the spindle gear components.
Can I fix the grinding myself?
Yes, you can attempt a DIY repair if the grinding just started. Remove the gearbox unit carefully and disassemble it to access the gears inside.
Inspect each gear for wear, cracks, or missing teeth. Replace any damaged gears with new ones. The key is proper reassembly with correct alignment between all components.
However, if grinding persists after your repair attempt, call a professional. Some damage runs too deep for DIY fixes.
What mistakes do people make during repair?
The biggest mistake is improper reassembly. Gears must align perfectly or grinding returns immediately. Many people also skip cleaning old grease and metal shavings before putting the gearbox back together.
Another common error is using too little lubricant after repair. Your gearbox needs proper lubrication to function smoothly.
How long does gearbox repair take?
A typical repair takes one to two hours if you work carefully. Disassembly takes about 30 minutes. Gear replacement requires another 20 to 30 minutes. Reassembly and testing takes the final 20 to 30 minutes.
Rushing this process causes alignment problems. Work slowly and double check your progress.

Hi, I’m Rue Hessel, the founder and voice behind TheGenTool. I’m a passionate tech enthusiast who loves exploring the latest gadgets, smart devices, and electronics that shape our everyday lives. Through my website, I share honest, hands-on reviews of trending Amazon products to help you make smarter and more confident buying decisions.